Daffodil

Daffodil
14 foot 1967 Williamscraft trailer

Thursday, September 4, 2014

Out In The Open

With all of the progress being made in Daffodil's restoration, it was time for her to come out of her winter home for awhile so her roof could be put back on.  Her winter quarters weren’t tall enough for this job, so she needed to come out of hiding and enjoy a little sunshine. 
Coming Out of HidingShe didn’t have her ‘face’ on yet but her roof had to go on before she could have her front finished.  Here she comes.  Forward. . .
Out in the Sunshine And then in reverse – into the driveway where the work will begin soon.
Backing InA good friend offered to help my sweetheart.  That made my sweetheart very happy because doing this job alone would have been quite difficult.  First they had to check the roof piece very carefully.  There were a few things that needed adjustment. . . Checking the Roof Skin And then they very carefully picked it up. . .
Pick Her UpAnd put it up on top of Daffodil.  That hole in the middle is where the roof vent goes.
Up and OverOnce the roof piece was up on top of the trailer, it took a lot of work to secure it in place.  Everything  had to be just right and it had to be nailed down before the front ‘skin’ could go on. 
Roof OnIt seemed like Daffodil was really starting to' bloom'.  You may think I'm  silly, but I love the round corners on the front.  I began to have the feeling that it really wouldn’t be long and my dreams would become reality.
Roof On 2 After the roof was secure and everything was adjusted just right, it was time to put her new front skin in place.  I stood and watched with joy as we finally began to see her exterior personality immerge again.
Front Skin Going OnYou can see that there is no window opening in the new front skin.  After it’s in place and tightly attached to the framework, my sweetheart will cut the window opening through the metal.  You have probably noticed that the bottom of the front skin doesn’t match the top.  The bottom piece is a tooled, stippled piece of aluminum that is placed there to handle rocks that fly up from road surfaces as she travels.  It’s called a rock guard.  The old one took a lot of hits over the years and it looked nothing like this beautiful new piece.  Next Spring when the weather is dry and warm enough, all of Daffodil’s parts that are gold now will be painted yellow.  That’s why I’m not worried about the old roof in contrast to the new front skin for now.  While the men were working on the front of the trailer I just had to go to the back and take another look inside.  I hadn’t seen her interior with sunshine peeking through her windows.  At the top right of the photo you can see the inside opening for the roof vent that will be matched up with the opening in the metal roof.
Looking InsideAnd I had to take another look at the little bit of floor my sweetheart had uncovered to show our friends when they came to visit.
Looking at the FloorSo much more has happened since I took these photos just a few days ago.  Please come back soon and see what she looks like now.  And I’ll let you in on a little secret!  I think you will be pleased – and amazed. 

Sunday, August 31, 2014

Things That Are Seen


I recently shared changes that won’t been seen when Daffodil is finished – now it’s time to start showing you what’s happened as we started to put her back together.  It’s getting exciting and things are happening very fast.  The changes that are happening now are things that can be seen.  My sweetheart is spending many long hours to work his magic and put her back together again.  I think you’re going to be amazed to see how much has changed since you last visited Daffodil. 

The next thing to do in the restoration process was the ceiling.  My sweetheart installed the paneling.  The light coming through the front window opening made it hard to get good photos.  This is taken from the front toward the back.Daffodil - New Ceiling - BackLooking toward the front, it looked like this.  I love the curve on the front corners.  Daffodil - New Ceiling - FrontAfter the paneling was up, my sweetheart cut out the openings for the front window and the ceiling vent.  He calls it my skylight!
Daffodil - New CeilingWhen the ceiling was completely installed, it was time to paint.  We decided to paint the ceiling and front wall with a soft, creamy, off-white paint.  Have you ever tried to choose white paint?  There are a million shades of white!
Daffodil - New Ceiling PaintedNext came the wall paneling.  This was a tedious job, at times, but my sweetheart worked hard to get it just right.  I chose oak paneling for the top part of the walls. . .
Daffodil - Upper PanelingAnd oak bead board on the lower part of the walls.
Daffodil - Beadboard I loved the way it looked when it all up on the walls.  Chair rail trim will be added between the paneling and the bead board after all of the cabinets and the closet are in.  Seams in the paneling and corners will have wood trim added, too.
Daffodil - Paneling and BeadboardThen it was time to add a finish to the wall paneling.  I envisioned whitewashed paneling that would allow some of the wood grain to show through.  We thinned the off-white paint we used on the ceiling and it was just perfect.  That worked great – it was just what I wanted.  The upper paneling is beautiful. . .
Daffodil - Whitewashed PanelingAnd I love the way the bead board looks with its new finish. Daffodil - Whitewashed Beadboard The photos look like I’ve added pink.  It’s not pink – it’s the way the light is shining on the walls where the grain is showing through the finish.
Daffodil - Whitewashed Wall My sweetheart’s brother used to have a flooring and counter top business.  He is doing general construction these days but he still installs a lot of flooring.  After the walls were finished he came and installed Daffodil’s new flooring.  It’s a beautiful hardwood-look vinyl.
Daffodil - New FloorI love this flooring – and it was free!  Last year my sweetheart’s brother hired him to help install this vinyl flooring throughout a home at the beach.  My sweetheart brought a small sample home to show me what they were doing.  I loved the sample and asked if he would find out where I could buy this same vinyl for Daffodil.  They went back the next week to finish the job and when he returned after their final day at the coast he brought a small roll of flooring that was left from the job they had just completed.  The homeowner didn’t want the scrap piece and it would have been dumpster bound so my brother-in-law sent it home for me to use in Daffodil.  I couldn’t be more pleased now that it’s in place – and free makes it even better!

Joey decided he should inspect the job.  He approved, but I think it may have been the attention he got that helped him decide.
Daffodil - Joey Checks New FloorWork continues and there will be more to share very soon.  There is a reason we are working so many long hours – there’s a deadline to meet.  I’ll tell you all about it when we come by to visit again.

Thursday, August 14, 2014

Unseen Changes

Recently I showed you where Daffodil spent the winter.  She was safe and secure and dry.  That was important because you may recall that her roof and some of her siding was off and two of her windows had been taken out.  We had planned to work on her through the winter but life brought some changes that put those plans on hold.   It was Springtime before we could start working on her restoration again.  Let’s go inside her winter shelter and see what’s going on.  My sweetheart has removed the tarps that covered the open roof and windows.  He has her opened up and he's working inside.  It looks like he has headphones on so he can listen to music.  No music today - he's been using loud power tools so he has his protective ear 'gear' on.Come On InCome inside for awhile – we can stand back and watch him work.  Watch your step – his ‘workbench’ takes a bit of space.  He has carefully laid out things he needs to use during the restoration project.
Daffodil WorkshopToday he’s beginning to stabilize Daffodil’s structure – her underpinnings.  When we removed all of the interior paneling we discovered the cause of a problem we had noticed on her exterior siding (called sheeting).  The sheeting had split diagonally at both back corners and the split had been filled with caulking.  Back Sheeting SplitWe didn’t know what had caused the split and we were concerned that it could happen again if we didn’t figure it out.  The moment I removed the interior paneling off the back wall my sweetheart knew what had happened – and he knew what to do to keep it from happening again!  The trailer was built using very thin boards on the back corners.  They weren’t sturdy enough to keep the trailer from twisting a bit as she went down the road.  She must have done a lot of twisting and shifting when her previous owner drove over dirt roads filled with potholes when he took her hunting high in the mountains of Oregon.  The twisting and shifting back and forth made the sheeting tear from the corners of the back window to the outside corner of the trailer.  My sweetheart checked up front and he decided that needed to be more stable, too. 
Needs WorkIt would take a lot of careful, tedious work but it had to be done.  No one would ever see all the work he was doing, but these unseen changes would make a big difference!  To start, he had to remove some pieces to make way for the stabilizing parts.
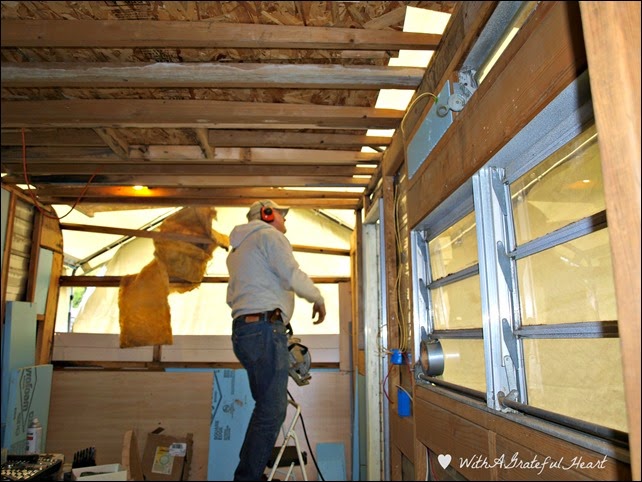
Cutting Out Old I have to detour a bit here because I see something I think you should see.  Look in the far end of the side window on the right of the photo above.  There’s a roll of duct tape!  My sweetheart got tired of picking it up off the floor, or searching for it, so he found a place where it would stay until he needed it again.  It doesn't move from there - he can always find it.  It’s quite a clever idea, don’t you think?
Duct Tape Holder Now, back to work!  First, he had to measure very carefully.  This old tool – a square – belonged to his father.  Imagine the stories it could tell!MeasuringMy sweetheart's work is precise – done right.  To perfection!  He’s very particular about things.  Maybe that’s because he doesn’t want to take them apart and do them over again!
Cutting A PieceTwo of the new pieces for the front corners seemed very complicated to me but it wasn’t long and he had them shaped and formed to fit perfectly. 
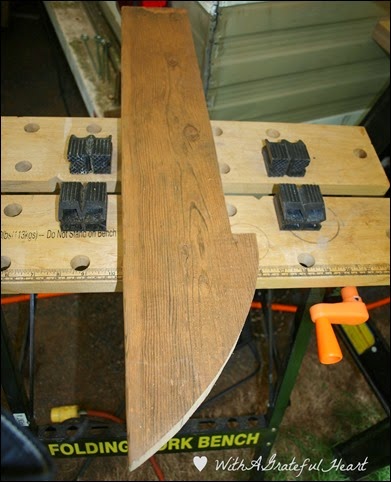
New Corner PieceHe carefully put the new pieces in place. . .
New Piece Goes InAnd then secured them so they would stay exactly where they need to be.
New Piece in PlaceWhen the front corners were stabilized, he moved to the back.  Stabilizing the back corners involved more than just adding more wood – it involved a major change that was the subject of much discussion.  My sweetheart had removed the back window when the restoration first began.  When it was removed we planned to put it right back in place when he was finished.  With the changes needed on both back corners we would ‘lose’ a few inches of window space because of the addition of wider boards.  There was no way around it – the old window wouldn’t fit.  We would have to decide what to do about that.  While we talked about it, thought it over and looked at our options he continued working on the back corners.  Then, one day the structural work was finished.  We felt like we had come to a major milestone – a turning point, you might say!  Now we could start putting her back together again.  I'm pretty sure I must have clapped my hands and jumped for joy as I stood outside of Daffodil’s back window opening and looked through toward her front window.  My sweetheart’s hard work had paid off.  Now we could start making this sweet trailer a thing of beauty.  What we had dreamed of for so long could begin to become reality.NameplateThings have changed since I took these photos.  A new window has been ordered, broken panes in the front window have been replaced and some things are beginning to come together inside.  I will share more very soon.  It’s getting exciting and I can’t wait to show you what we're working on now!

Tuesday, July 29, 2014

The Winter Hide-Out

Daffodil - BackWinters in Oregon are usually quite wet.  With Daffodil opened up and her interior exposed, we knew we had to get her under cover before the weather began to change.  One Fall day my sweetheart bought a temporary shelter that we knew would be the perfect place for her to spend the winter.  The shelter was big enough that we could work on my trailer through the winter.   We thought she would be almost finished by Spring.  First, the shelter had to be assembled.Daffodil's Winter Home Goes Up My sweetheart and a good friend of ours worked to get things ready for Daffodil’s move to her winter hide-out.  First the roof and support poles went up.  Yes, I know – it’s leaning to one side but that would be fixed after it was completely up and guide wires were added to each side.  The big wheels and tires were the perfect anchor until everything was well secured. Side walls were attached and the back wall with its zippered door (that provides easy access to the inside).Daffodil's Winter Storage - Back Zipper DoorWhen that was all in place it was time for the big move.  My sweetheart hooked up Daffodil so she could be moved from our driveway to the shelter, just a few feet away.Daffodil - Ready To Go
In just minutes, she was resting inside the new shelter where she would stay through the winter. Daffodil Under Cover

Daffodil - Looking Out
My sweetheart added the front wall of the shelter so the trailer would be completely protected from the winter rains.Dave Finishes the Cover
 
Under CoverIt wasn’t long before this task was complete.  We were relieved that Daffodil could rest - safe and sound - no matter what happened through the winter season.   I could probably write a book about a couple of the storms that ‘tossed’ this shelter around a bit but my sweetheart had it well secured.  And Daffodil was safely snuggled inside - ready for a ‘long winter’s nap’!

Saturday, May 17, 2014

Daffodil Under Wraps

It has been quite awhile since you last saw the work being done on Daffodil.  That’s because there wasn’t much that happened for several months!  Because she had no roof and because some of her exterior sheeting had been removed, we had to protect her inner workings from the Oregon rains that come throughout the year.  So, my sweetheart devised a way to keep her dry and protected from moisture and anything that might cause damage or undo what had been accomplished.  Even the neighbors commented on my sweetheart’s ingenuity!  This is what she looked like as she sat in our driveway during some of the Spring and Summer months last year.Daffodil Under WrapsI must admit, this was not a thing of beauty – but it did what was needed.  The ‘contraption’ on the top?  One neighbor asked if we were building an A-frame!  With the roof removed, our sometimes-heavy rains would cause the tarp to sag and fill with water.  It could get so heavy that the tarp would collapse into Daffodil under the weight of the water and we would have a real mess!  My sweetheart made a plywood ‘roof’ above the tarp so the rain would run off.  Pretty smart idea!  I never would have thought of that.  In fact, I questioned the idea when I first saw it but it proved to be the right thing!

Then, when the weather promised to be bright and sunny and warm for awhile, my sweetheart uncovered Daffodil and started working on the inside again.  We couldn’t leave the tarp around her while we worked inside on warm days.  It would have been unbearably hot in there.  It was time to remove the old paneling and make way for the repairs she needed before new paneling could be installed.  (I still haven’t figured out why my sweetheart didn’t remove the piece of insulation that was hanging down over the front opening!)Working on Daffodil My sweetheart began to remove the bad parts of the old paneling in the front of the trailer.Dave and Daffodil He tried to leave as much of the thick blue insulation in the walls as possible.Daffodil's Insulation Every trace of the old paneling had to go! Daffodil's Old PanelingI used a small crowbar and hammer to ‘rip’ off the old paneling on the back and side walls while my sweetheart worked on more difficult tasks.  It was a big job but it wasn’t long before it was all gone. Daffodil WIthout Old PanelingAll of the windows eventually need to be removed – some for repair.  All of them need the aluminum frames and tracks polished.  The front window had already been removed right after we found the moisture damage in the front roof area.  The next to go was the back window.Dave Removes Back WindowIt took both of us to lift the big window out.  Now Daffodil was open in the front and in the back.Back Window MissingI like the little lights on the back of Daffodil.  They have to come off to be refurbished.  And I love her ‘label’ that tells who she is and where she came from.  There is another one on the front.  I plan to restore both signs.  I’m not sure I want red on the beautiful yellow color that will replace the gold. I have to think about that.  Since she isn’t going to be restored to her original condition – there will be changes – it won’t hurt to paint the signs a different color.  I don’t have to decide right now.  That might wait until she has been put back together and her exterior has been repainted.  Adding her little labels will be one of the last tasks to do!  I wanted one more photo of them in place before they came down.Rear Lights and Label There’s a lot more work to do – and a lot of things have happened since these photos were taken.  We are working on her again.  We had planned to work through the winter so she would be finished and ready to roll this Spring, but life took some sharp turns and kept us from doing what we had planned. 

You will have a front-row seat for the rest of the journey.  I wouldn’t dream of leaving you behind!

Tuesday, May 13, 2014

The Work Continues

Work continues on Daffodil – my little, vintage trailer.  We had planned that she would be finished by now but a ‘surprise’ discovery revealed that her structure needed strengthening to prevent problems on the road.  While we are disappointed that she won’t make her maiden voyage to a girlfriend campout next month, it is a good thing we found the problem now. My sweetheart is working hard to put her back together.

Tuesday, August 27, 2013

Detour Along The Way

NOTE:  My blog ‘With A Grateful Heart’ has disappeared again.  Some of you have emailed to ask me what has happened.  It’s a long story – and I am very frustrated – but I’m working on it.  This happened last year about this time.  I had been assured the problem was fixed and settings were changed so it wouldn’t happen again.  Not true!  Now I find – without any warning – that my blog was taken down.  My dashboard and all of my posts and photos are still there, thankfully, but they don’t show up when you try to find them online.  After many hours searching for the answer and being ‘shushed’ around from pillar to post with non-answers, I finally contacted someone who helped me take the first step to resolve the issue.  Now I’m waiting for them to ‘process’ things and get my blog up and running again.  So, this is the only way I can let you know what has happened.  I have a custom domain for ‘With A Grateful Heart’ – that’s where the problem is.  ‘Daffodil’s Journey’ is still with BlogSpot so this one is not affected.  I’m still here and I have things to share but there’s no way to do it until someone ‘flips the switch’ and gets my blog restored.  Be assured that you will hear from me as soon as I have access again.

Now – let’s continue to see what has happened with Miss Daffodil!  When I last posted about her ‘situation’ it was clear that we had to make big changes in our plans.  She will not be ready to go anywhere this year!  I want to show you what my sweetheart did to dismantle the roof.  Because of the way the roof sheeting was overlapped by the front sheeting, everything on the front had to come off, too.  That left her rather exposed!Insulation ExposedOnce the front sheeting was removed, my sweetheart began the long process of removing the roof.  Piece by piece.  Layer by layer.
Working on the RoofOnce the metal sheeting and the insulation were gone, it was easy to see the roof supports.  The problem area was quickly found and decisions were made about the process needed to fix it.Roof CollageThen my sweetheart went inside and removed the ceiling panels.  Wow!  Did that ever let a lot of light in.  I asked him if we could just make one big skylight.  He suggested that I might not like it if  I wake in the morning to see critters looking down at me.  Sometimes it’s best not to know what’s up there!Open RoofMaybe it would be possible to have a retracting roof!  Sports arenas have them now.  They open when the sun is shines – and close when it rains or snows!  Now, there’s an idea!Open Roof 2We’re not discouraged by all of this.  My sweetheart knows exactly what to do and this is an opportunity to add some amenities we wouldn’t have been able to add if we only made cosmetic changes.Open Roof 3
So, my friends, that’s the way things were for awhile.  But there’s more.  This is our chance to change the wall paneling and make some big changes.  So, we kept going – more dismantling was in our future.  To be continued. . .